This week we put our Instagram Quick Recipe Video up for a vote and you guys chose this recipe. When my mother and father got married, my mom received a set of Time Life cook books from the late 70's. As a kid I would go through the books and look at the pictures and decide which dishes looked best. I was always drawn to a recipe called "Sautéed Chicken with Tart Green Grapes". This is my adaptation of the recipe. The process for cooking the chicken I learned from the amazing Jamie Oliver and I use it all the time to ensure extra crispy chicken. Enjoy!
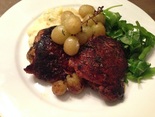
Crispy Chicken Thighs with Roasted Green Grapes
Serves 4-6
Ingredients:
1 cup seedless green grapes
1 Tbsp. olive oil
6 sprigs of thyme, leaves removed
8 whole chicken thighs
1 Tbsp. unsalted butter
2 cloves of garlic, minced
1 cup white wine
kosher salt and freshly ground pepper, to taste
Method:
1. Preheat the oven to 400 degrees F.
2. Place the grapes onto an aluminum lined baking sheet, drizzle with olive oil and sprinkle with half the thyme and salt and pepper to taste. Place in the oven and roast until the skin is just starting to burst, about 30 minutes. In the meantime prepare the chicken.
3. Using paper towel, pat the chicken thighs dry and liberally season with salt and pepper.
4. Heat a large cast iron pan over high-heat. Once heated add the chicken thighs, skin side down and sear until brown on both sides, about 4 minutes per side.
Turn the chicken back skin side down and cover with a small piece of parchment, followed by a plate or pan and something heavy (like a can) to weigh it down. This step will ensure that the skin gets super crispy. Cook under the weight for an additional 5 minutes. Remove the chicken from the pan and cover with aluminum foil to keep warm.
5. Drain the chicken fat from the pan and place back onto medium-low heat. Add the butter, let melt and then add the garlic and remaining thyme and cook until softened and fragrant, about 30 seconds. Add the white wine and scrape the bottom of the pan (deglazing). Lower the heat to low and cook until the liquid is reduced and syrupy, about 4 minutes.
6. Place the chicken thighs onto a plate or serving platter, pour the white wine reduction on top and finish with the roasted grapes.
Enjoy!!!


 RSS Feed